Some tips to make your work easier. Believe me, Windows is not as alien thing as you want to believe. Most of the work can be done from command line (as you usually would on Linux). Applies to regular Windows users as well.
This is essentially one of the four blog posts. Don’t worry, you will find the other three as you read.
Do not let Windows Update get in your way.
I have seen a lot of people complain Windows Update reboots in the middle of their work. Although the situation has improved quite a lot in recent days, still, you would want to avoid this possibility as much as possible.
Now to save myself some time, I will link my blog post where I cover how to “fix” automatic updates and install updates manually as per your convenience.
How to have Windows 10 NOT get in your way
Ofcourse, by following the steps the responsibility of managing the security of your computer falls entirely on you.
Install a package manager
Considering the target audience of this blog post, I think I do not need to emphasize on the importance of package managers and the convenience they provide.
In this section I will be covering scoop and chocolatey. Both package managers will cover most of your stuff you will usually need.
Scoop
Scoop is a package manager that installs packages without polluting your path. By default, it always fetches portable versions so you will rarely need admin privilege (UAC) to install a package and rest assured the installed packages will not mess with registry.
Before installing Scoop you lust have PowerShell 5 (or later) and .NETFramework 4.5 (or later) installed. You can also read their documentation.
Installation
Follow the instructions here or head to their github.
Open PowerShell by pressing Win+Q > powershell
Change execution policy in order to run the installation script
Set-ExecutionPolicy RemoteSigned -scope CurrentUser

Enter Y when prompted
Paste the following line to download and run installation script
Invoke-Expression (New-Object System.Net.WebClient).DownloadString('https://get.scoop.sh')
If everything works as expected then you will see the message Scoop was installed successfully! in your console.
By default, Scoop installs all your programs under ~/scoop. If you wish to install Scoop to a custom directory then set SCOOP environment variable to your preferred location and run the installer.
$env:SCOOP='D:\your\new\location\Scoop'
[Environment]::SetEnvironmentVariable('SCOOP', $env:SCOOP, 'User')
Packages are categorised into various buckets (main, extra, games, etc.) so you’ll need to add them as needs arise. A list of (and details about) buckets can be found in their github linked above.
By default, the main bucket is installed. To get more packages, you will need the extras bucket. To install it, run
scoop install git
scoop bucket add extras
Search for packages with
scoop search <package name>
See installed packages with
scoop list
Get package information with
scoop info <package name>
See which packages can be updated with
scoop status
Update packages with
scoop update
Uninstall packages with
scoop uninstall <package name>
In case a package is not available on Scoop, you might want to check Chocolatey
Chocolatey
Normally, Chocolatey installs packages in their preferred location, requires admin rights (which allows packages to clutter registry, run at startup and what not). I will cover both normal installation and non-admin install. Detailed instructions are available at Chocolatey docs.
Normal install
Run the following command in elevated PowerShell
Set-ExecutionPolicy Bypass -Scope Process -Force; [System.Net.ServicePointManager]::SecurityProtocol = [System.Net.ServicePointManager]::SecurityProtocol -bor 3072; iex ((New-Object System.Net.WebClient).DownloadString('https://chocolatey.org/install.ps1'))

Being the careful person you are, always review any script you download before running it on your computer.
Installing to a different location
Create a machine/user level environment variable named ChocolateyInstall, set it to your preferred location and make sure the environment variable is set globally and is visible to PowerShell. Install as normal.
Non-admin install
Copy ChocolateyInstallNonAdmin.ps1 from their website. Modify it to suit your needs and run
.\ChocolateyInstallNonAdmin.ps1

Using Chocolatey
search for packages with (alias for list)
choco search <package>
See package information with
choco info <package>
Install packages with
choco install <package>
Uninstall packages with
choco uninstall <package>
Update packages with
choco upgrade <package>
Update all packages with
choco upgrade *
And a lot more, see docs.
Install the packages you are familiar with
scoop install wget curl nano vim less bat
Ofcourse, this is just an example
Personally, I am not a fan of Adobe Reader. So I use Okular.
scoop install okular
Get yourself a decent shell
There is not much option. We will be installing PowerShell Core. It is actively updated and does not have nasty alias.
scoop install pwsh
Time to install a decent terminal emulator
There are quite a few nice ones, namely cmder, ConEmu and Windows Terminal. All the three are highly customisable. There are also not so popular ones (hyper, terminus). Install Windows Terminal with
scoop install windows-terminal
You can split the terminal horizontally with Alt+Shift+- and vertically with Alt+Shift++

You might also want to make Windows Terminal beautiful and PowerShell fancier as you normally would with zsh or fish. I have covered it extensively in my other blog post.
Make PowerShell fancier with Windows Terminal
To change Windows Terminal settings, press Ctrl+, or open it directly with
vim "~/AppData/Local/Microsoft/Windows Terminal/settings.json"
Hit Tab, arrow keys and Enter while typing to help yourself

You do not need Azure Cloud Shell so set hidden attribute to true.
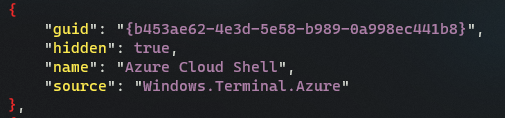
End result:

Set new defaults as you use Windows
Say you want to open a file and are prompted to choose an application to open a file and you do not find your preferred program.
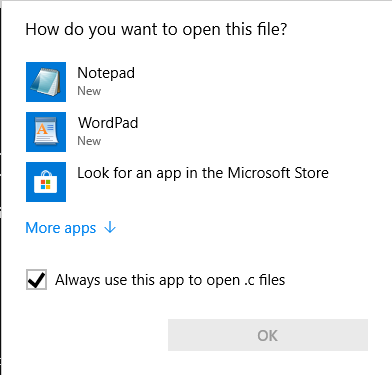
Click on More Apps. If you still do not find it then click on Look for another app on this PC. Navigate to your installed application (which in my case is ~/scoop/apps/notepadplusplus/current/notepad++.exe), select your executable and click Open.

Note: When selecting an application under scoop, always select the one under current folder (you will see an arrow in its icon). It is a shortcut (symlink) to the latest version of the package. Scoop links current to the latest version so you do not have to worry about updating the defaults after every update.
Show file extensions in File Explorer
I don’t know why it is disabled by default but it is defintely a good feature.
Click on View tab and check File name extensions box.

Connect to an FTP server using File Explorer
This works the same as in nautilus and dolphin. Press Win+E > Ctrl+L. Now you will be presented to the address bar. Enter FTP address and continue as normal.
See all Start menu apps in File Explorer
Honestly, I haven’t seen its use case except one but it is definitely neat. Press Win+E > Ctrl+L, type shell:AppsFolder and hit Enter.

Copy the output of a file to a clipboard
Your normal output redirection you usually do in Linux works in PowerShell too. So instead of that I am just covering copying output to clipboard. Pipe the output to Set-Clipboard.
your-command | Set-Clipboard

Use Tab completetion frequently
Being a person with weak memory as I am, this is definitely one of those features which must be enabled. Helps a ton.

SSH into remote computer
Now you no longer to use PuTTY to SSH into remote computer. Enable SSH by pressing Win+I > Apps > Apps & Features > Optional Features > Add a Feature. Select OpenSSH Client and OpenSSH Server and click Install. (Reboot if prompted), open PowerShell Core and ssh as normal.

Despite all these, you have WSL2 too which I have covered in my other blog post.
Install and configure Arch Linux in WSL/WSL2 with GUI
Next step
Enjoy.

Whooosh, can’t wait to make my Win-computer at work more usable for me!
Thanks a lot for writing!
LikeLike